Monday, April 25, 2016

Mixed Up Manic Monday

I've had this idea for a while.  Mixed Up Manic Monday will be a blog post every Monday where I will share videos, tutorials, projects, product reviews and whatever else is of interest to mixed media artists.  My goal is to inspire and inform you.  You don't need to be a member of my blog but I would love it if you would join if you haven't already!

Here is what my desk looks like today.


This weekend I did massive amounts of Gel Plate printing and I got some really cool prints to share with you.  Here are a few.


I am creating a video for Gel Press that has a very cool technique that you will have to wait to find out about.  It is so easy and results in some really pretty prints. Not sure when that will be available but most likely some time in May.  Here is a little sneak peek.


So as a creative person, what types of things do you like to see on creative blogs? More videos? If so, about what? Photo tutorials with step by step instructions?  What don't you like? Too many photos? Lots of blathering and not enough photos?  Don't be shy, comment below!  I really want your input!

Thanks for visiting my first Mixed Up Manic Monday blog post! See you next Monday, or maybe before!

Now go make something!!!

Kathy

Friday, April 22, 2016

Reusable Tote Made from Plastic Bags

Happy Earth Day! I have a special project today to share that I recently made using plastic shopping bags.  Despite using reusable ones, somehow I accumulate them anyway.  I gathered them all together and followed this youtube video, which was surprisingly simple!  I don't sew and hate following patterns so that just goes to show you anyone can do this!


Reusable Tote Made Using Plastic Bags (front)
My poor abused sewing machine! I ran into some trouble with the handles, which were very difficult to sew on at the end. I may shorten them, since they are a bit too long.  In addition to using plastic shopping bags, I added some dry cleaning bags, which have a great advantage because they are much longer.

Reusable Tote Made Using Plastic Bags (back)
Things to do different the next time I make this bag:

1. Don't make the plastic "fabric" as thick.  Four or five bags are enough to fuse together.  
2. Don't try to add paper in between the bags.  It doesn't stick.
3. Apply the duct tape to the top BEFORE sewing the bag together.  
4. Sew the handles on before sewing the bag together.  
5. Consider adding only one handle.

And now, a video about plastic, and its effect on our environment.  Please, please watch!


Next time you go to the grocery store, I want you to think about this image and remember to take your reusable totes with you!


Does anyone else have upcycled projects that they create?  I would love to hear about them in the comments.

Till next time,

Kathy

Check out these sites for more info about how to stop using so much plastic.

Homemade laundry detergent

Plastics: I Pledge to Reduce My Use

Ryot 

Tote Bag Tutorial


Wednesday, April 20, 2016

Happy Earth Day!


Welcome to the Gel Press Earth Day Blog Hop!  We want to encourage you to reuse and recycle with Gel Press.  Have you thought of making Gel Press Prints on old maps?  What about old Christmas cards or even magazines?  Hop around and see what our designers have come up with for this hop.  

We will be giving away a prize again for the comments on the Gel Press Blog.  Comment on what your favorite project was and why.  We will accept comments from April 20 - April 24.  The winner will be announced April 25th on our FB Page and on Gel Press Junkies FB page!  Good Luck!


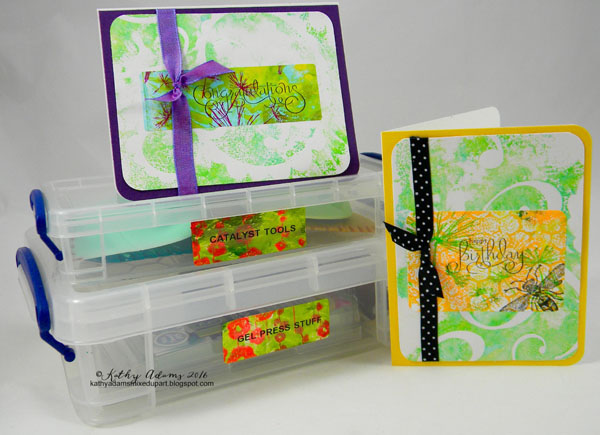
Today I have an easy tutorial using the 8" Round Gel Press to make artsy labels for use in organizing craft supplies, for my handmade laundry detergent and lotion, and even cards and art projects!

Gel Press Labels
In honor of Earth Day, I made a tutorial on my blog a few days ago about how I make my laundry detergent.  You wouldn't believe how much money I save and how easy it is!  Plus, I am not buying dozens of plastic containers that pollute our oceans. Find out more about it here.
Lavender Laundry Detergent with Gel Press Labels
I used Avery labels in a couple of different sizes, including round, and the 8" Round Gel Press to make them.  You can even custom print them on their website, Avery.com.  


I pulled out some smaller rubber stamps and stencils along with heavy body paints.  I'm also using embossing folders on the Gel plate for this project because the designs are smaller and will show up well on the labels. I am using the 8" round Gel Plate.  Why, you ask?  Read more to find out. 


Step 1
Put three shades of green paint onto the 8"round Gel Plate and brayer.  


Step 2
Press an embossing folder into the Plate. I just have to stop here and tell you how much I LOVE using these folders on the Gel Plate.  You need to try it if you haven't yet! Using the embossed and debossed sides results in a cool positive and negative effect that is hard to get with any other tool.  Don't forget to clean the folder asap.  


Step 3
Grab a sheet of labels and press down onto the Plate. I printed in the middle of the label sheet.


Step 4
Print the edges of the label sheet, adding more paint (repeat step 1) when needed.  


Here is the reason that I chose the round Gel Plate instead of the 8"x 10" Gel Plate: some of the labels peeled off when I tried to print the whole sheet in one pull on the rectangle plate.  Using the round plate seemed to work much better since I was printing smaller areas.  The 6" x 6" or 5" x 7" Gel Press would work well for this project also.  


Step 5
After cleaning my plate with a baby wipe, I printed another label sheet using purples, pressing a dandelion stamp into the plate.  


Step 6
I use the rubber stamp with purple paint from the Gel Plate to stamp onto the green label sheet. Using the Gel Plate is an excellent way to "ink" up your stamps.  


After the label sheets are completely dry, I printed a few of them using Avery.com, which allows me to customize individual labels using their templates.  


I gel printed a couple more sheets of labels and made some cards with them. 


And organized some art supplies too!


To see how I make my homemade laundry detergent, go to this blog post.


Don't forget to visit the blog hoppers and see their Gel Press projects.  Then go to the Gel Press Blog and comment for a chance to win a round Gel Plate!
Bix 
Kathy <-------You are here

Thanks for visiting today! 
Kathy

Share your creations on our Facebook page, Gel Press Junkies.

Shop for all of the Gel Press Plates at gelpress.com.

For inspiration, visit the Gel Press Pinterest page at https://www.pinterest.com/gelpress/


Friday, April 15, 2016

A Win Win Idea: Make Your Own Liquid Laundry Detergent

It is so easy to make your own laundry detergent and you will save hundreds of dollars, plus it helps the environment.  A win, win, win situation!  Before we get to the tutorial, I need to get on my soap box for a minute.

Earth Day is a few days away and I've got good news and bad news. First the bad. Our oceans are suffering and it's our fault. 

"Over the last decade humans have thrown away far more plastic than previous years. Scientists support the idea that reducing the amount of plastic that is used in everyday items will help reduce the problem." Kristen Silven  


The Great Pacific Garbage Patch is located in the central North Pacific Ocean and is larger than the state of Texas. There are also garbage patches in the Indian and Atlantic ocean. The patches are defined as containing a higher amount of plastic as compared to surrounding oceans. To date, five patches in total have been discovered. Rubbish soup?!


And for my sushi loving friends.

Scientist found that plastics break down in the ocean much faster than we previously thought. That's good news right? Nope. Plastic contains toxins and are not biodegradable. They brake up into tiny toxic pieces that are consumed by fish, sea mammals and birds, thus entering the food chain. Sorry, my sushi loving friends. Read more about it here: Plastics In the Ocean Affecting Human Health.


So enough gloom and doom! I am here to help you save lots of money AND help save the oceans, one plastic container at a time! I've been making my own laundry detergent for years now and came up with a way that is fast and easy, works great in my (front load) washer, and does a great job cleaning my clothes. I've also realized that in doing so, I've stopped buying dozens of plastic containers of Tide. Lots of people ask me how I make it, so I though I'd put together a short tutorial.  

Homemade Liquid Laundry Detergent 
Yield: 1.5 gallons
Cost:  $3.06

Supplies 

1 cup Borax

1 cup Washing Soda

1/2 bar Dr. Bronner's Bar Soap (I use lavender scented)

Grater

Large Pot

Storage Jars

Funnel 


Step 1
Fill a large pot with 1 and a half gallons of water and turn on the burner to medium/high. Tip: save a gallon jug for measuring.


Step 2
Add 1 cup of Borax and 1 cup of Washing Soda and stir.  


Step 3
Grate 1/2 bar of Dr. Bronners Soap.  This is the hardest part.  I use my Pampered Chef cheese grater and it makes it super easier.  Add it to the pot and stir.


This is how it looks before it starts to simmer.


Step 4
The trick to making this detergent is to bring the solution to a simmer and stir occasionally until the grated soap is completely dissolved. This helps to break down the bar soap and makes it dissolve better in the washer. As it cools, it becomes more gel-like. It should look clear while it's hot, like this picture.


Turn the burner off and let the solution cool.  

Step 5
Using a small pitcher or measuring bowl with a spout, scoop out the detergent and put into containers.  A funnel helps for narrow mouth jars. I use glass jars that are easy to pour that I purchased at TJ Maxx for $1.99 each and put the excess in large, wide mouth mason jars.  You can also recycle a couple of gallon jugs or detergent containers.  


Note: As the detergent cools, it has a gel-like consistency and becomes cloudy and separates a bit.  It's important to shake the container before using. 


To use: Shake! Use 1/4 cup per load. 

Stay tuned for my next blog post on how I made the artsy labels.


Cost Comparison 
note: 128 oz. = 1 gallon, 8 oz = 1 cup

Homemade:
Borax 76 oz.                              $4.21     
Washing Soda  55 oz                $3.97     
4 bars Dr. Bronner's Bar Soap  $16.16    (1 bar of soap costs $4.04)             

Total, 1,320 fluid oz.                $24.34  
           
Tide, 100 fluid oz.:                   $10.77   

I can make 1,320 ozs. (over 10 gallons!) of homemade detergent for $24.34  If I bought 1,320 ozs of Tide, it would cost me $142.16.  (1.320 ÷ 100 = 13.2 x $10.77) 

That is a savings of $142.16 - 24.34 = $117.82

Since I make this detergent in 1.5 gallon batches, I will break it down per batch.

Homemade per 1.5 gallons:

Cost per cup = $0.56
Cost per cup = $0.46
1/2 bar          = $2.02

Total             = $3.04 

Tide per 1.5 gallons = $16.16 

That is a savings of $13.12!

Other benefits:

  • Less musty smell in front load washers. I don't know why, but it is true!
  • Customize the scent. Dr. Bronners soap comes in lavender, citrus, peppermint, almond and unscented.  I use lavender because it has a fresh scent that even the men in my family are okay with. You can even get more creative and add essential oils to the detergent. Try peppermint soap with eucalyptus oil.  
  • Say goodbye to unexplained rashes and the doctor bills that go with them!
  • Since the homemade detergent is very concentrated, use only 1/4 cup of detergent per load. I'm not sure how much Tide I used per load, but it's either the same or more. So chances are, you will save even more money!
  • Save more money and use a cheaper bar soap. Zote costs under $2.00 per bar! (I use Dr. Bronners because I know that is won't make me break out!) 
  • Your kitchen will smell heavenly!
Thanks for visiting! Now, go make some homemade detergent!

Kathy


See Kathy's art work on Pinterest: https://www.pinterest.com/katluvsdogs/my-art/

More links:

National Geographic News


Plastics In the Ocean Affecting Human Health


Fortune Magazine Report: Plastic pollution in the ocean are reaching crisis levels 


10 Ways to Reduce Plastics